


Conceptual futuristic technology digital light abstraction. High resolution illustration 10604.
Knowing How to Program an FPGA is a Skill you Need―and Here’s How to Start
James Reinders, Consultant and HPC Enthusiast, James Reinders Consulting LLC, and Tom Hill, DSP Product Line Manager, Programmable Logic Group, Intel Corporation
Why FPGAs?
Field-programmable gate arrays (FPGAs) are exciting because they offer high performance with low latency and power efficiency. These benefits are realized through their massive parallel capabilities coupled with reconfigurability. An FPGA provides a reconfigurable sea of gates on which anyone can:
- Design a custom hardware accelerator
- Deploy it for a single application
- Quickly reconfigure the device as a new accelerator for a different application
This article explains how you can make your own designs and use them to accelerate your applications.
Hardware engineers have long used FPGAs in place of ASICs in a variety of applications. Historically, configuring them (programming) has been done with high-level definition languages like Verilog* or VHDL*. These design methodologies are familiar and useful for hardware engineers but completely foreign to software developers.
New tools centered on OpenCL* bridge this gap to bring the benefits of FPGA hardware platforms to software developers. Using these new tools, we can view FPGAs as highly configurable devices that can transform custom algorithms, written in a C-like syntax, into fast and power-efficient hardware. The flexibility and performance of these solutions are significant, thanks to the latest generation of FPGA devices.
Massive Parallelism
An Intel® Stratix® 10 FPGA can offer as much as 10 TFLOPs per second of single-precision performance. Also, it’s not limited to standard number formats. For instance, implementing a 2-bit deep neural network is not only possible, it’s easy thanks to Intel’s upcoming Deep Learning Accelerator configurable workload that was demoed at Supercomputing in November 2017.
Intel FPGAs offer massive amounts of parallelism, with hardware flexibility to reduce latency (Figure 1). Data movement is optimized because the FPGAs are naturally programmed in a dataflow—or pipelined—way, leading to reduced data transfers between the host CPU and FPGAs.
Sounds Great…So What’s the Catch?
Today, nothing prevents C programmers from following along and trying their hands at FPGA programming. As with all programming specialties, there’s a learning curve when programming FPGAs using OpenCL, including new development environments and new methods. Fortunately, both are addressed through online training and OpenCL coding guides that make FPGA programming very approachable.
FPGA Development Environments
OpenCL software development environments are based on Eclipse* or Visual Studio*, so they’re already familiar to C programmers. In this article, we’ll describe ways to write a first program in OpenCL and run it on an FPGA.
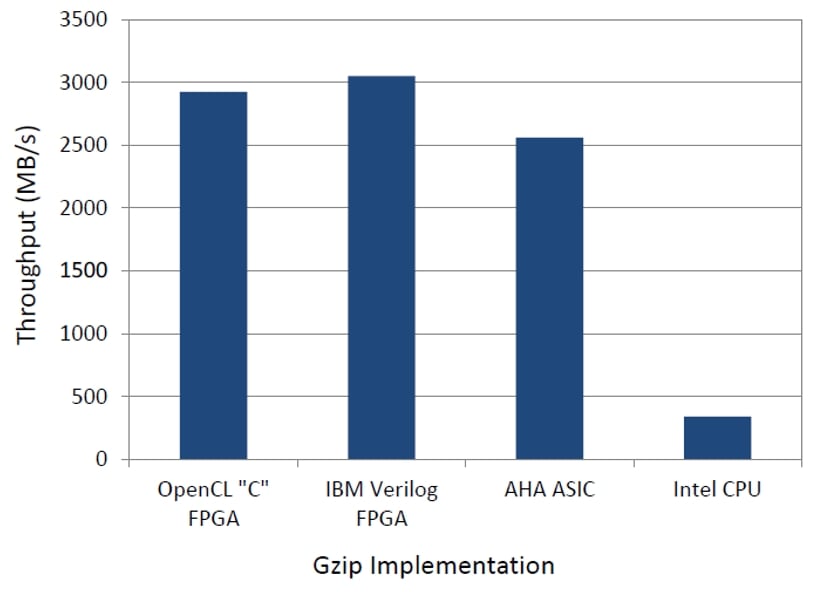
Figure 1. OpenCL coming of age for FPGAs: Competitive results using highly productive OpenCL FPGA programming versus three other traditional, but less productive, approaches. (See “Gzip on a Chip” in the Learn More and Explore section at the end of this article.)
FPGA Optimizations
For any new device and programming method, there are tips and tricks to achieve top performance. These optimizations may range from familiar approaches, such as data structure organization and clean thinking on algorithms, to the most effective ways to express pipelining with OpenCL. In less common situations, we can use hardware description language programming (Verilog* or VHDL*) similar to how we might use inline assembly for special needs on a CPU. FPGA optimization efforts end up feeling different―but no better or worse―than optimizing for a CPU or a GPU.
Similar to CPUs or GPUs, FPGA programmers can use libraries written for FPGAs (which hardware engineers commonly refer to as IP blocks). (The Intel® FPGA SDK for OpenCL™ Best Practices Guide is an excellent follow-on to this article for exploring optimization for FPGAs in more depth.)
Three Approaches to Trying Out FPGA Programming Now
We’ll detail three ways to try out FPGA programming:
- Emulation. We can develop and debug using ways to try out FPGA programming without having to purchase FPGA hardware. This is always the recommended first step for developing and debugging a program. The SDK runs on Windows* or Linux*.
- Offline compile. After debugging our emulated compilation, we can use the OpenCL environment, without an FPGA, to do a compile that will generate the FPGA programming file. This can provide accurate area and performance reports for the OpenCL kernel, helping us refine our code before actually running it on an FPGA.
- Cloud. We can use tools and FPGAs on Nimbix* systems in the cloud, from any browser on any system, to do all development from emulation through running on an FPGA. The current configurations include CPU-based machines with just the Intel® tools, as well as machines with the tools and an Arria* 10 FPGA. Cost starts at $0.36 per hour for program development and $3.00 per hour for using an FPGA-equipped machine. Nimbix systems run Linux.
We could also use an FPGA development board as our target platform. This gives access to the full power of the most advanced FPGAs. The cost for a single PCIe card is approximately $5,000 if equipped with an Intel® Arria® 10 FPGA or $11,000 if equipped with an Intel Stratix 10 FPGA. Technically, we could try an Intel® Cyclone®-based FPGA development board with OpenCL. The DE1-SoC Board might seem tempting, and it’s only $250. Unfortunately, as shown in Table 1, the part is generally uninteresting for computational acceleration. To experiment with OpenCL on an FPGA for computational acceleration for under $250, we recommend a combination of options 1, 2, and 3 above. Despite our recommendation, we’ve used the Intel OpenCL SDK with the DE1-SoC Board and it does work quite well. It simply lacks compute power.
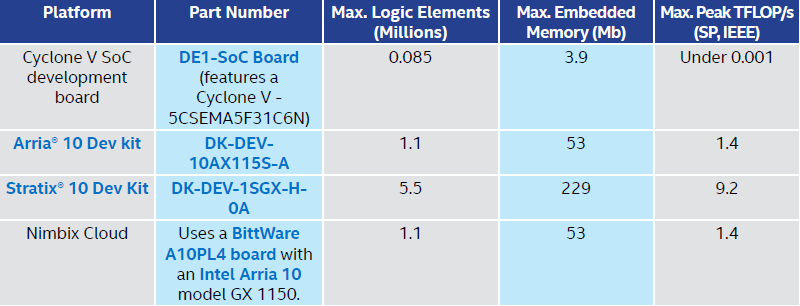
Table 1. Some of the Intel FPGA Platforms with OpenCL support
The Intel Arria and Stratix families are aimed at application acceleration, while the Intel Cyclone family is aimed at low-power embedded usage. OpenCL is well-supported on both Intel Arria and Intel Stratix. Plus, there are some Intel Cyclone V SoC boards supported. No matter what board we choose, we’ll need a board support package (BSP), which the OpenCL SDK uses to properly target a specific system configuration.
Why OpenCL?
OpenCL is a standard that extends C with a programming model for accelerating algorithms on heterogeneous systems. Central to OpenCL, like CUDA*, is the concept of a kernel running on a device (hardware accelerator). Kernels are written in a subset of C99*. Unlike CUDA, OpenCL is a portable, open, royalty-free standard designed to support virtually any compute device including CPUs, GPUs, and FPGAs.
OpenCL also includes an application program interface (API) for the host (CPU) to communicate with the device (an FPGA in our case), traditionally over PCIe, or for one kernel to communicate with another without host interaction. In addition to this, Intel provides an I/O Channel API to stream data into a kernel directly from a streaming I/O interface such as 10Gb Ethernet*.
In the OpenCL programming model, the user schedules tasks to command queues. Each device has at least one command queue. The OpenCL runtime then breaks the data-parallel tasks into pieces and sends them to the processing elements in the device. This is the way a host communicates with any device. It’s up to the individual device vendors to abstract away the vendor-specific implementation. The Intel® FPGA SDK for OpenCL does this and conforms to the OpenCL 1.2 standard.
The Intel® FPGA SDK for OpenCL
The Intel FPGA SDK for OpenCL allows a user to abstract away the traditional hardware FPGA development flow for much faster and higher-level software development. We can emulate OpenCL accelerator code on an x86-based host in seconds, and get a detailed optimization report with specific algorithm pipeline dependency information. This allows us to debug our program before we wait for the longer compile time needed to generate the final code to run on an FPGA.
The Intel FPGA SDK for OpenCL facilitates development by abstracting away the complexities of FPGA design, allowing software programmers to write hardware-accelerated kernel functions in OpenCL C*, an ANSI C-based language with additional OpenCL constructs.
As part of the SDK, Intel provides a suite of tools to further resemble the fast development flow of software programmers, including:
- An emulator to step through the code on an x86 CPU and ensure that it’s functionally correct
- A detailed optimization report to help you understand the load and store inner loop dependencies
- A profiler that provides performance insight into the kernel to ensure proper memory coalescence and stall-free hardware pipelines
- An OpenCL compiler capable of performing over 300 optimizations on the kernel code and producing the entire FPGA image in one step
The Intel FPGA SDK for OpenCL supports a variety of host CPUs, including Intel® Xeon® processors, the embedded ARM Cortex-A9* processor cores in SoCs, and IBM Power Systems* processors. It supports scalable solutions on multiple FPGAs and multiple boards, as well as a variety of memory targets such as DDR SDRAM for sequential memory accesses, QDR SRAM for random memory accesses, or internal FPGA memory for low-latency memory access. Half-precision, as well as single- and double-precision, floating-point computation is also supported.
Trying FPGA Programming
Let’s explore the three methods for trying FPGA programming.
Emulation
The emulation method doesn’t require an FPGA. When writing an OpenCL program for an FPGA, emulation is a crucial first step that allows us to efficiently debug OpenCL code. Because compiling for an FPGA is much slower, and debug options are more limited, it’s highly preferable to debug as much as possible using emulation before moving to an FPGA.
Let’s consider a simple vector add to illustrate these three methods for trying out FPGA programming. We downloaded and installed the Intel FPGA SDK for OpenCL, and we downloaded the vector add example from the Intel FPGA software design center. After we download and unpack the .zip file for Windows, or the .tar file for Linux, there is a README.html with additional instructions. The SDK and the example code are free to download, install, and use. We were able to do this on Windows and Linux―plus, we found the OpenCL SDK to be very effective on a MacOS* system running Linux inside a VBox*.
It’s important to avoid spaces in the path to our code. We ran into several issues which seemed to occur because the tools were not prepared to handle spaces in the path. There are mentions of this in some of the documentation for the FPGA tools, but not in places we’d be likely to read if we were only interested in OpenCL. (Work is underway to remove these limitations in the future.)
There are three steps in the emulation method:
- Build the FPGA code.
- Build the host code.
- Run the program.
Build the FPGA Code
The FPGA code consists of kernels written in OpenCL. We specify that we want to use emulation with the -march=emulator option on the Altera OpenCL* compiler (aoc*). If we forget this option, the compile will take several hours because it will do the full synthesis, place, and route for the FPGA. With -march=emulator, the compile takes mere seconds and simply creates x86 code so we can run our program without an FPGA. Since our goal is emulation, we’ll use this option. From the vector_add directory, we followed the README.html directions and used the command:
| aoc -march=emulator device/vector_add.cl –o bin/vector_add.aocx |
Build the Host Code
The host code is written in C with calls to the OpenCL API to setup the FPGA, load kernels, and use them on the FPGA. On Windows, the instructions have us use Microsoft Visual Studio* (the free Community version worked for us). On Linux, a Makefile lets us do a simple “make” which uses the GNU C++ compiler.
Run the Program
Here, it’s important to follow the README.html instructions to set CL_CONTEXT_EMULATOR_DEVICE_INTELFPGA=1 so the host program expects to run emulated FPGA code. The instructions are good, but we offer two additional tips.
First, before doing any steps, initialize the OpenCL SDK variables:
- Windows: %INTELFPGAOCLSDKROOT%init_opencl.bat (on our system, this was C:intelFPGA17.1hldinit_opencl.bat).
- Linux: $INTELFPGA_ROOTDIR/hld/init_opencl.sh (on our system, this was /opt/intelFPGA_pr/17.1/hld/init_opencl.sh).
On Windows, also initialize the Visual Studio variables to make sure everything is done consistently for 64 bits. (We had compile failures on our system when we failed to do this.)
- Find and run vcvars64.bat (on our system, this was C:Program Files (x86)Microsoft Visual StudioShared14.0VCbinamd64vcvars64.bat)
Offline Compile
The OpenCL environment can be used to perform a compile that will generate the FPGA programming file and reports. These reports are created automatically by the aoc command. There is also a -fast-compile option which creates the programming file output and the report much faster, with some loss of performance (i.e., 10 to 20 percent) for the FPGA. These reports are useful in optimizing a kernel, and they are statically created during compilation―meaning there’s no need to actually run the program on an FPGA to get this output. However, we do need to compile for a specific FPGA (hence the -march=emulator option will not produce reports). From the vector_add directory, we used the same command as we did when building the FPGA code:
| aoc -march=emulator device/vector_add.cl –o bin/vector_add.aocx |
Within seconds, the compiler prints out a utilization report:
| aoc: Optimizing and doing static analysis of code…
!========================================================================= ! The report below may be inaccurate. A more comprehensive ! resource usage report can be found at vector_add/reports/report.html !========================================================================= +——————————————————————–+ ; Estimated Resource Usage Summary ; +—————————————-+—————————+ ; Resource + Usage ; +—————————————-+—————————+ ; Logic utilization ; 18% ; ; ALUTs ; 9% ; ; Dedicated logic registers ; 9% ; ; Memory blocks ; 9% ; ; DSP blocks ; 0% ; +—————————————-+—————————; Compiling for FPGA. This process may take a long time, please be patient. |
These resource utilizations give us an idea of how well our OpenCL program is using the parallelism available on our FPGA. This can be valuable tuning information and it’s available without having to wait for a long compilation. If we use too many resources, the program might not fit on a particular FPGA. But, even more commonly, if we’re using too few, we may have opportunities to tune our code to get even more performance. It’s not hard to understand that if we’re using only 10 percent of the devices (e.g., the floating-point capabilities), we’re not getting maximum performance.
More detailed reports are available after the full compile is done. These reports are more accurate, so they’re important for fine tuning, but they take longer to create. This is where the fast compile option is very helpful, even without an FPGA, because the reports come out faster (i.e., in a quarter of the time). (The Intel® FPGA SDK for OpenCL™ Best Practices Guide from Intel does a good job of explaining how to use the reports.)
Multiple results, which previously had to be done manually, are now done automatically by the compiler and assembled so that we can view them in a browser. We start by finding the report.html file created during compilation (Figure 2). (The previous utilization report shows where the file is located.)
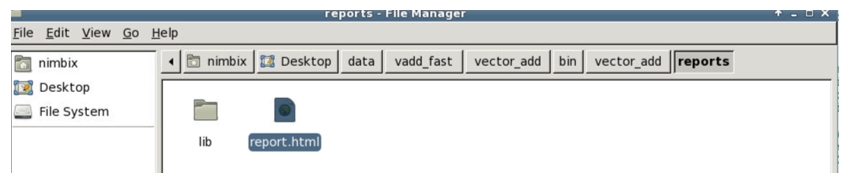
Figure 2. Opening the report
The resulting page has multiple reports we can browse through. Figure 3 shows a summary for the vector add example. It’s interesting that this detailed report, which came after nearly an hour of compiling, confirms the utilization estimates reported in the first few seconds of the compilation (9 percent ALUTs used, 9 percent dedicated logic registers, 9 percent of the memory blocks, and none of the DSPs). Figure 4 shows an area analysis report, which allows us to drill down into the program to understand the relationship of our source code and resource utilization.

Figure 3. Summary page from compilation using –fast-compile

Figure 4. Area analysis of system report from compilation using –fast-compile
A final useful tip: the “aocl env aocxfilename.aocx” command can give interesting information detailing how the aocx file was compiled (more details than shown in the report.html summary).
Cloud
The cloud method doesn’t require us to have our own FPGAs, nor do we have to download or setup any software. Instead, we setup an account with Nimbix and pay based on usage. We had success using this approach from every browser we tried, on MacOS, Windows, and Linux hosts. With rates starting at $0.36 per hour, prorated to the second, we didn’t run up significant charges to try out OpenCL and saved a tremendous amount of time by not having to do hardware or software setup. In all, we spent less than $5 to try the vector add example on Nimbix.
Unlike other FPGA-in-the-cloud-systems, Nimbix and Intel did not create special versions of their tools to enable cloud work. This means we can use the same free tools from methods 1 and 2 to build binaries that run in the cloud if we want to avoid fees for building the FPGA code. It might feel more natural to develop, debug, and build locally until we’re ready to run on an FPGA. Likewise, the cloud has the latest tools, with the bonus that compilations will also work on non-cloud systems if we have the same board as those used in the cloud.
Because the Nimbix folks set up everything in advance, there’s no need to install the OpenCL tools―or even to source the init_opencl script. But we do need to get a Nimbix account, activate an instance, and download the example code before we can follow the instructions to run the example.
Here are the steps we took to utilize the Nimbix cloud:
- Sign up for an account using this link. Fill out only the customer and billing Information. Do not select PushToCompute. The total should be $0.00 when we submit.
- Open up the Quick Start Guide for Intel FPGA Development Tools on the Nimbix Cloud published by Intel. This contains a lot of useful information, but also has a lot of things we don’t need to know to use OpenCL. We recommend reading it and making a special note of the fact that we get storage at /data on the machine, which can be read and written without activating a machine (see the section on Persistent Storage and Data Transference).
We recommend starting by following the emulation instructions presented earlier in this article, but do it in the cloud. Here’s how:
- Visit https://www.nimbix.net, click “Login,” and log onto the system. Click “Compute” (menu on the right side), and enter “Quartus” in the search field to narrow to the machines to consider using. Select the latest Quartus version available (17.1 for us) and “PAYG”.
- Next, select “Desktop,” then select the CPU/memory desired. For the example, two CPUs worked fine for emulation compiles and runs. We recommend the eight-CPU machine, primarily because of the extra memory, to do a non-emulation build.
- When the machine is ready, click to connect, which gives you access to use the machine. Please note that charges continue until you terminate the machine (which you can do by clicking the “N” in the lower left corner, selecting “Log Out,” and then selecting “Shutdown”). Note that disconnecting a terminal window does not terminate the machine running, so charges will continue. We prefer to kill the machine from the dashboard (https://www.nimbix.net) because it shows if anything is active and verifies that all activity has stopped.
- In the machine, right-click to bring up a menu and select to open a terminal window.
- We recommend working in the /data directory so that work is preserved. Therefore, we start in the terminal window with the command:
| cd /data |
- Visit the OpenCL Vector Addition Design Example webpage and find the link for the tar file (.tgz). We like to use wget to fetch it:
| wget https://www.altera.com/content/dam/altera-www/global/en_US/others/support/examples/download/exm_opencl_vector_add_x64_linux.tgz |
- Untar it:
| tar xvf exm_opencl_vector_add_x64_linux.tgz |
- README.html explains the rest. We need only three simple commands to build the FPGA code, build the host code, and then run it (these compilations and run collectively take well under half a minute):
| cd vector_add |
| aoc -march=emulator device/vector_add.cl –o bin/vector_add.aocx
make |
| CL_CONTEXT_EMULATOR_DEVICE_ALTERA=1 bin/host -n=10000 |
Congratulations. At this point, the OpenCL program has run in the cloud using emulation. To run on an actual FPGA, we need to rebuild (for the FPGA) and then run it:
- Rebuild. Compile using the aoc without the -march=emulator flag. For us, that took just under three hours
| aoc device/vector_add.cl –o bin/vector_add.aocx |
Using the -fast-compile option, the 17.1 compiler built the aocx file in under an hour, using this command:
| aocl -fast-compile device/vector_add.cl –o bin/vector_add.aocx |
- Run. We need to run on a machine equipped with an FPGA. Since Nimbix uses the BittWare* A10PL4 boards with Intel Arria 10 FPGAs, we start by selecting “Application” with the A10PL4 name in it. We need to be sure that the machine type selected actually has access to an A10PL4 board. To do this, select a machine type in the pulldown that is not simply “(CPU only)” but also includes A10PL4 (Figure 5). Access to at least one such FPGA-enabled machine should be available

Figure 5. Example of selecting an FPGA enabled machine from the pulldown menu of machine types
- Run the application using the command (without setting CL_CONTEXT_EMULATOR_DEVICE_ALTERA):
| bin/host -n=10000 |
Congratulations should be in order again. A successful run should produce something like this:
| Initializing OpenCL
Platform: Intel(R) FPGA SDK for OpenCL(TM) Using 1 device(s) a10pl4_dd4gb_gx115 : A10PL4 (acla10pl40) Using AOCX: vector_add.aocx Reprogramming device [0] with handle 1 Launching for device 0 (10000 elements) Time: 0.409 ms Kernel time (device 0): 0.062 ms Verification: PASS |
The aocl diagnose command is useful to query the available card(s) in a system:
| aocl diagnose
aocl diagnose: Running diagnose from /opt/intelFPGA_pro/17.0/hld/board/a10pl4/linux64/libexec ————————- acl0 ————————- Vendor: BittWare Inc Phys Dev Name Status Information acla10pl40 Passed A10PL4 (acla10pl40) PCIe dev_id = 2494, bus:slot.func = 02:00.00, Gen3 x8 FPGA temperature = 52.6523 degrees C. DIAGNOSTIC_PASSED ——————————————————— |
The new -fast-compile option offers substantially faster compiles when using a 17.1 build from December 2017 or later. This is a unique Intel advantage for the dreaded slow compilation of FPGAs. The -fast-compile option results in a slightly less efficient FPGA program (normally 10 to 20 percent reduction) in exchange for much faster compiles (often four to five times faster). For designs that consist of multiple kernels, an incremental compile option is available that will automatically identify the kernels that have changed and only recompile the changes.
OpenCL: High-Performance, Open, and Well Supported
We’ve barely scratched the surface of showing how powerful OpenCL programming is for FPGAs. For instance, Intel OpenCL supports hooks for profiling actual runs on the FPGA and studying the results. Also, Intel OpenCL has extensive support for FPGA performance, including host and I/O channels. Channels are an extension to the OpenCL language, created by Intel to support data streaming directly from the I/O or host to the FPGA kernels.
We hope this article gets you started exploring the new world of programming FPGAs with OpenCL. There are many reports, tools, libraries, and extensions on the Intel and Altera websites, including free training resources.
Developing for heterogeneous computing? Get your free download of Intel® SDK for OpenCL™ Applications.
Learn More and Explore
- Intel® FPGA SDK for OpenCL™
- Documentation for Intel® FPGA SDK for OpenCL™
- The Intel® FPGA SDK for OpenCL™ Best Practices Guide is an excellent place to learn more about how to think about FPGAs when writing in OpenCL, and it gives good information on reports and what they mean.
- Quick Start Guide for Intel FPGA Development Tools on the Nimbix Cloud
- Intel FPGA Software Design Center is where to download code examples.
- Intel FPGA platforms has links to accelerator boards.
- Official OpenCL standards information
- Intel Altera product information on the Intel Cyclone 10 LP, Arria 10, and Stratix 10 families
- Paper evaluating gzip acceleration via OpenCL + FPGA from the International Workshop on OpenCL 2014: Gzip on a Chip: High Performance Lossless Data Compression on FPGAs using OpenCL